


You’ve decided your stock brakes aren’t cutting it anymore. Maybe the pedal goes soft after a few hard stops on a mountain road. Maybe you’re getting into track days and your factory pads are fading by the third session. Or maybe you just want shorter stopping distances and a firmer pedal for your daily driver.
Whatever the reason, a brake upgrade kit is one of the best modifications you can make to any vehicle. It improves safety, builds driver confidence, and (unlike a lot of mods) actually helps you go faster by letting you brake later and harder.
But not every brake upgrade is the same. The right kit for a weekend track warrior is different from the right kit for a daily-driven muscle car, and both are different from what a truck owner who tows needs. Here’s how to choose.
What’s in a Brake Upgrade Kit?
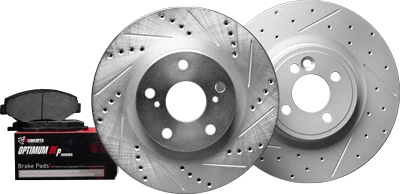
A quality brake upgrade kit includes everything you need for the swap in a single box:
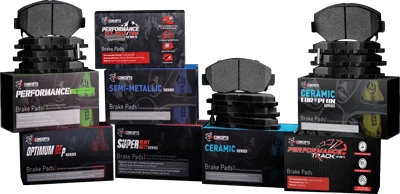
Brake pads. The friction material that does the actual stopping. Upgrade kits pair higher-performance pad compounds with the rotors they’re designed to work with. That matched pad-to-rotor pairing is important, because the friction compound is engineered for the specific rotor surface.
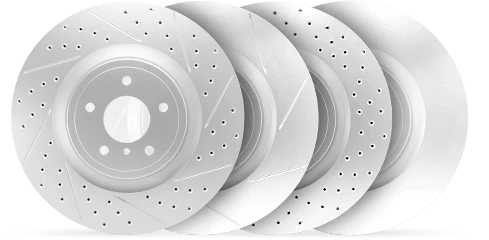
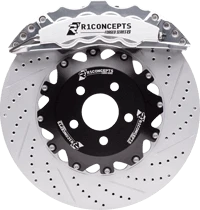
Brake rotors. Upgraded rotors may be drilled, slotted, or drilled and slotted for better heat management and gas venting. Some kits stick with blank (smooth) rotors but upgrade the metallurgy for better heat capacity and durability.
Mounting hardware. Clips, shims, and anti-rattle hardware that keep the pads seated correctly and reduce noise. Good kits include this. Cheap kits make you reuse your old, corroded hardware.
Brake lines (some kits). Stainless steel braided brake lines replace the factory rubber lines that can expand under hard braking. The result is a firmer pedal feel and more consistent brake pressure, especially during repeated hard stops.
Upgrade Level 1: Daily Performance
Who it’s for: Daily drivers who want better stopping power, less dust, and a more confident pedal feel without any downsides in normal driving.
What changes: Higher-quality pad compound and upgraded rotors (typically drilled and slotted for heat management and a cleaner look through the wheels). You keep your factory calipers and brake lines.
This is the most popular upgrade level because it’s a direct bolt-on replacement. No modifications needed. Your factory caliper, bracket, and hydraulic system stay in place. You’re just swapping the wear items for better ones.
What to expect:
- Shorter stopping distances from normal driving speeds
- Less brake dust on your wheels (especially with ceramic compounds)
- Better fade resistance on mountain roads or spirited driving
- A firmer, more responsive pedal feel
- Cooler-looking rotors visible through your wheels
R1 recommendation: An R1 eLine Drilled and Slotted rotor kit paired with R1 CERAMIC Series pads. The eLine rotors give you improved heat dissipation and the drilled/slotted pattern keeps the friction surface clean. The ceramic compound provides excellent stopping power with minimal dust and noise for daily driving.
Upgrade Level 2: Street Performance
Who it’s for: Enthusiasts who push their vehicles on twisty roads, occasional track days, autocross, or spirited weekend drives. These owners need brakes that can handle repeated hard stops without fading.
What changes: More aggressive pad compound designed for higher operating temperatures, plus performance rotors with better heat management. Optional stainless steel brake lines for improved pedal feedback.
This level is still a bolt-on replacement, but the pad compound is formulated to perform at higher temperatures than a daily-driver ceramic. The tradeoff is usually a little more noise and dust compared to a pure ceramic pad, because the formulation prioritizes heat tolerance and initial bite over quiet, dustless cruising.
What to expect:
- Significantly better fade resistance during aggressive driving
- Stronger initial bite (the brakes grab harder with less pedal pressure)
- Consistent pedal feel even after multiple hard stops
- More brake dust than a ceramic setup (the price of higher friction)
- Excellent confidence on canyon roads, autocross, and HPDE events
R1 recommendation: R1 eLine Drilled and Slotted rotors paired with R1 PERFORMANCE Series pads. For owners who also want the pedal firmness upgrade, add R1 Stainless Steel Brake Lines to eliminate the spongy feel that factory rubber lines develop under repeated hard braking.
Upgrade Level 3: Track / Competition
Who it’s for: Dedicated track day drivers, time attack competitors, and anyone who regularly pushes their vehicle to its braking limits in a controlled environment.
What changes: Aggressive friction compound designed for extreme temperatures, slotted rotors (preferred over drilled for sustained high-heat use), stainless steel lines, and high-temperature brake fluid.
At this level, you’re optimizing for peak braking performance under extreme conditions. The pads may not be ideal for cold, low-speed driving (they can be noisy and dusty on the street), so some track drivers run a separate set of street pads for daily use and swap to their track pads before events.
What to expect:
- Maximum stopping power at sustained high temperatures
- Minimal fade even during 20+ minute track sessions
- Aggressive initial bite that lets you brake later into corners
- More noise and dust during normal street driving
- Potentially reduced cold performance (some track compounds need heat to work)
R1 recommendation: R1 eLine Slotted rotors (no drilling, since the holes can become stress risers under extreme repeated thermal cycling) paired with R1 PERFORMANCE Track pads. Add high-temperature brake fluid (DOT 4 racing fluid, minimum 500°F dry boiling point) to prevent brake fluid boil during extended sessions.
Upgrade Level 4: Big Brake Kit
Who it’s for: Owners who have outgrown their factory brake system entirely. Typical candidates are heavily modified vehicles with more power, more grip (from tire and suspension upgrades), and more speed than the factory brakes were designed to handle.
What changes: Larger rotors, multi-piston calipers, new brackets, performance pads, and stainless steel lines. This is a system-level change, not a component swap.
A big brake kit replaces the entire front (and sometimes rear) brake system with larger components. Bigger rotors have more surface area to generate friction and more thermal mass to absorb heat. Multi-piston calipers (4-piston, 6-piston) apply pad pressure more evenly across the pad surface and provide stronger clamping force than a factory single-piston slider caliper.
What to expect:
- Dramatically shorter stopping distances
- Vastly improved heat capacity for track use
- Firmer, more precise pedal feel
- May require larger wheels to clear the bigger calipers
- Higher cost (calipers, brackets, and larger rotors add up)
Important: Big brake kits require wheel clearance verification before purchase. The larger calipers may not fit behind your current wheels, especially if you’re running factory wheel sizes. Check the minimum wheel diameter specified by the kit manufacturer before ordering.
drilled vs slotted rotor comparison vs Drilled and Slotted: Which Rotor Style?
This question comes up on every brake upgrade. Here’s the straightforward answer:
Drilled and slotted is the best all-around choice for street and street-performance use. The drilled holes help vent gas and moisture from the pad surface, the slots scrape the pad to expose fresh friction material, and the combination looks great through open-spoke wheels. For 90% of enthusiasts, drilled and slotted is the right call.
Slotted only is the better choice for dedicated track use and sustained high-heat applications. The slots provide the pad-scraping and gas-venting benefits without the stress concentration points that drilled holes create. Under extreme thermal cycling, drilled holes can become crack initiation points. Slotted rotors eliminate that risk.
Blank (smooth) is the choice for maximum pad life, quietest operation, and the longest rotor service life. If you’re upgrading pads only and don’t care about the visual upgrade or the minor performance gains of drilling/slotting, blank rotors work perfectly.
Coating Matters (More Than You Think)
When choosing an upgrade kit, pay attention to whether the rotors are coated.
Bare cast iron starts rusting the moment it’s exposed to air. On an upgraded rotor that’s visible through your aftermarket wheels, that corrosion looks terrible within months. The hat section (center area), edges, and cooling vanes all develop rust that’s visible from the outside.
Coated rotors solve this. A quality coating on the non-friction surfaces protects against corrosion, keeps the rotor looking clean through the wheels, and extends shelf life if the kit sits in your garage for a few weeks before installation.
R1 Concepts rotors feature Geomet coating as standard. Geomet is a zinc-aluminum flake coating originally developed for the European automotive OE market. It provides excellent corrosion protection, withstands the thermal cycling of brake rotor use, and maintains a clean silver appearance through the life of the rotor. You won’t see rusty hat sections and edges after a couple of months.
The Break-In Process (Don’t Skip This)
Whatever upgrade level you choose, the break-in process is what determines whether your new brakes perform as designed or develop problems within the first few weeks.
New brake pads need a controlled heating and cooling cycle to condition the friction material and establish a proper transfer film on the rotor surface. Skip this step and you risk uneven pad deposits on the rotor, which causes the vibration and pulsation people mistakenly blame on “warped rotors.”
Basic break-in for street pads:
- Make 8 to 10 moderate stops from 35 mph (don’t come to a complete stop)
- Make 2 to 3 slightly harder stops from 45 mph
- Drive for 2 to 3 minutes without braking to cool down
- Avoid sitting on the brake pedal at stoplights with hot brakes
Break-in for performance/track pads:
- Make 8 to 10 progressively harder stops from 50-60 mph
- Allow 30 seconds between stops for partial cooling
- Final 2 to 3 stops should be firm enough to briefly activate ABS
- Cool-down drive of at least 5 minutes at moderate speed
For a deep dive on the bedding process, check out our brake pad bedding guide.
How to Choose the Right Kit for Your Vehicle
Still not sure which upgrade level fits your situation? Run through this quick checklist:
| Your Situation | Recommended Level | Key Products |
|---|---|---|
| Daily driver, want less dust and shorter stops | Level 1 (Daily Performance) | Drilled/slotted rotors + ceramic pads |
| Spirited driving, occasional canyon/mountain runs | Level 2 (Street Performance) | Drilled/slotted rotors + performance pads |
| Monthly track days or autocross events | Level 2 or 3 (Street Perf or Track) | Slotted rotors + performance/track pads |
| Dedicated track car or time attack | Level 3 (Track/Competition) | Slotted rotors + track pads + racing fluid |
| Heavily modified, big power, sticky tires | Level 4 (Big Brake Kit) | Larger rotors + multi-piston calipers |
| Truck or SUV that tows regularly | Level 1 with semi-metallic pads | Drilled/slotted rotors + semi-metallic pads |
FAQ
How much does a brake upgrade kit cost?
Pricing varies by vehicle and upgrade level. A Level 1 daily performance kit (pads + rotors for one axle) typically runs $150 to $400. A Level 2 street performance kit with stainless lines can run $300 to $600. Big brake kits start around $1,000 and go up from there depending on caliper size and components.
Can I install a brake upgrade kit myself?
Level 1 and Level 2 kits are direct bolt-on replacements that a handy DIYer with basic tools can handle in a few hours. Big brake kits are more involved (new brackets, potential brake line routing changes) and are better suited for experienced DIYers or professional installation.
Will a brake upgrade void my warranty?
Replacing wear items (pads and rotors) with aftermarket parts does not void your vehicle warranty under the Magnuson-Moss Warranty Act. The dealer would need to prove that the aftermarket brake parts specifically caused a failure in order to deny a warranty claim on a related component.
Do I need to upgrade front and rear at the same time?
No. Most braking force (60-80%) happens at the front wheels. Upgrading the front brakes first gives you the biggest improvement for the money. You can upgrade the rear later if needed.
Shop the full R1 Concepts brake upgrade lineup at r1concepts.com. Use the vehicle search tool to find the exact kit for your year, make, and model.
A brake upgrade is one of the few modifications that makes your vehicle both faster and safer. Better brakes let you carry more speed into corners, stop shorter in emergencies, and drive with more confidence on every road.
